
First, we dont want to mess up the default stylesheet, for two reasons:
So we navigate to "%APPDATA%\PixelSnake\NetworX\style" (just enter that in the file explorer).
Here we find a single file, called "default.css". Copy it into the same folder and rename it to something different. The folder should look something like this:
Now open the new file with your favourite text editor, we will be using Brackets in this tutorial.
This tutorial uses version 0.6.170322 of NetworX. In future versions there might be more CSS properties supported or the file might look different.
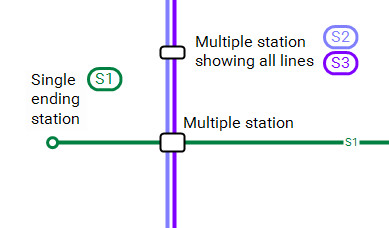
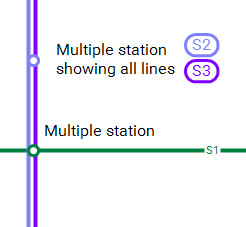
Currently we are able to determine the looks of stations, single and multiple, line labels and station labels:
For all elements there are two CSS classes: The element base class and the .bright class. The second one is used, if the line color is brighter than a certain treshold. This is, because e.g. a white line color on white background can become a //little// bit different to look at.
It is important to note, that if auto is used as a color, it gets replaced by the line color. For a station with multiple lines connected, this is the one that has the biggest width and has been added the last. [note[Please note: Until now, also none and transparent will be replaced with the line color. If you want a transparent background, use rgba(0, 0, 0, 0.01). This is not intended and will later be fixed.]]
Before starting to edit, you should also make sure, that the checkbox Automatically reload when file is changed is checked in Edit -> Settings -> Stylesheet. Then open the example.tnm file in networx. Then go to Edit -> Select Stylesheet and select the new file we just created. Now you can start editing the CSS. Everytime you save, the CSS will get applied to NetworX automatically.
The station style is determined by the following piece of CSS:
/* the single trainstation */
station {
    background: #fff;
    border: 3px solid auto;
    width: 10px;
    height: 10px;
    border-radius: 5px;
}

station.bright {
    background: auto;
    border: 1px solid #000;
}
For the station, all available properties are background, border, width, height and border-radius. You can use other properties, but they will have no effect. We could, for example, make a single station sqare, filled with the line color and really huge like this:
station {
    background: auto;
    border: 5px solid #000;
    width: 50px;
    height: 50px;
    border-radius: 0px;
}
From the bright class, currently only the background and the border property take effect, so we only specify these here.
Stations having multiple connections become grey boxes with a black border by default. This is determined through the following CSS:
/* trainstation with more than one line connected */
station.multiple {
background: #fff;
width: auto;
height: auto;
border: 2px solid #000;
border-radius: 3px;
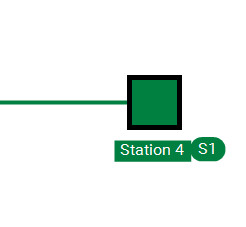
}We could use the normal single station style from above and apply it on this one, just to see how it looks:
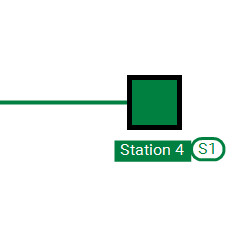
These are the texts next to stations. There are four different kinds of station labels, being
station label {
    position: relative;
    color: #000;
    background: #000;
}

station.ending_default label {
    padding: 0 3;
    color: #000;
    background: rgba(0, 0, 0, 0.01);
}

station.ending label {
    color: #000;
    background: auto;
}

station.all label {
    color: #000;
    background: #f00;
}
For example, we could give the terminating station a colored background for the label:
station.ending_default label {
    padding: 0 3;
    color: #fff;
    background: auto;
}
You can actually almost ignore these at the moment, as the only thing changeable is the color and the corner radius for the "steps" linemode.
These are the small boxes next to the station names, showing the name of the line. The are specified like this:
linelabel {
    border-radius: 10px;
    padding: 0 4;
    color: auto;
    background: #fff;
    border: 3px solid auto;
    margin: 5 0 0 5;
}
linelabel.bright {
    border-radius: 10px;
    padding: 0 4;
    color: auto;
    background: #fff;
    border: 3px solid auto;
    margin: 5 0 0 5;
}
If we wanted them to have a colored background and white text, we could achieve it like this:
linelabel {
    border-radius: 10px;
    padding: 0 4;
    color: #fff;
    background: auto;
    border: 3px solid auto;
    margin: 5 0 0 5;
}
linelabel.bright {
    border-radius: 10px;
    padding: 0 4;
    color: #fff;
    background: auto;
    border: 3px solid auto;
    margin: 5 0 0 5;
}
And this would be the result:
I hope, this tutorial helped you a bit into understanding how to use CSS to style NetworX. I will improve both the tutorial and the styling machanism itself during the developement process, so stay tuned to future updates!